Imagine the aroma of freshly baked French bread wafting through your home, a golden crust crackling as it cools, and a soft, airy interior begging for a smear of butter. This foolproof recipe delivers that magic with just four simple ingredients and no fancy equipment. Whether you’re a beginner baker or a seasoned pro, this homemade French bread will make you feel like you’ve stepped into a Parisian boulangerie. With its crisp crust and chewy texture, it’s perfect for cozy dinners, sandwiches, or simply savoring with a drizzle of olive oil. Let’s dive into this recipe that’s as easy as it is delicious, designed to keep you hooked and your kitchen warm with love.
Why This French Bread Recipe Steals Hearts
This recipe isn’t just about baking bread—it’s about creating memories. The joy of pulling golden loaves from the oven, the satisfaction of slicing into a crust that shatters just right, and the delight of sharing warm bread with loved ones make this a must-try. Here’s why you’ll fall in love:
🌟 Minimal Ingredients: Just flour, water, yeast, and salt—pantry staples that transform into something extraordinary.
⏰ No Kneading Needed: Let time work its magic, making this recipe effortless for busy bakers.
🍞 Versatile Perfection: From breakfast toast to dinner table star, this bread elevates every meal.
🥖 Bakery-Quality Results: Achieve that iconic crispy crust and fluffy interior without stepping foot in a bakery.
Every bite of this bread brings a sense of accomplishment and comfort, reminding you of the simple pleasures of homemade food. Ready to bake a loaf that’ll have your family begging for more? Let’s get started.
Ingredients for Two Perfect Loaves
To create this bakery-worthy French bread, you’ll need just a handful of ingredients. Don’t let the simplicity fool you—these basics are all you need for magic.
- 4 cups (480g) bread flour (or all-purpose flour for a slightly denser loaf)
- 1 ½ cups (360ml) warm water (about 105°F/40°C—warm but not hot)
- 2 tsp instant yeast (or 2 ¼ tsp active dry yeast)
- 2 tsp salt
- Optional: 1 tbsp sugar (for a faster rise and subtle sweetness)
- Optional: Cornmeal (for dusting the baking sheet, adding a rustic touch)
These ingredients are likely already in your kitchen, waiting to be transformed into something extraordinary. If you’re using active dry yeast, dissolve it in the warm water with the optional sugar and let it sit for 5-10 minutes until foamy before mixing.
Step-by-Step Guide to French Bread Bliss
This recipe is designed to be approachable, with clear steps that guide you to success. Each stage is simple, rewarding you with a loaf that looks and tastes like it came from a professional bakery. Let’s break it down.
1. Mix the Dough (5 Minutes)
In a large mixing bowl, whisk together the flour, yeast, and salt until well combined. The dry ingredients should look uniform, with no clumps of yeast or salt. Slowly pour in the warm water, stirring with a wooden spoon or your hands until a shaggy, slightly sticky dough forms. It doesn’t need to be smooth—just make sure all the flour is incorporated.
This step is where the magic begins. The dough might look rough, but that’s exactly what you want. It’s the foundation of a loaf that’s rustic and full of character.
2. First Rise (1 Hour)
Cover the bowl with a clean kitchen towel or plastic wrap and place it in a warm, draft-free spot. Let the dough rise for about 1 hour, or until it has doubled in size. If your kitchen is cool, try placing the bowl near a sunny window or in an oven with the light turned on for gentle warmth.
As the dough rises, the yeast works its wonders, creating air pockets that will give your bread its airy, chewy texture. This hands-off step is perfect for multitasking—maybe sip some coffee or prep a soup to pair with your fresh bread.
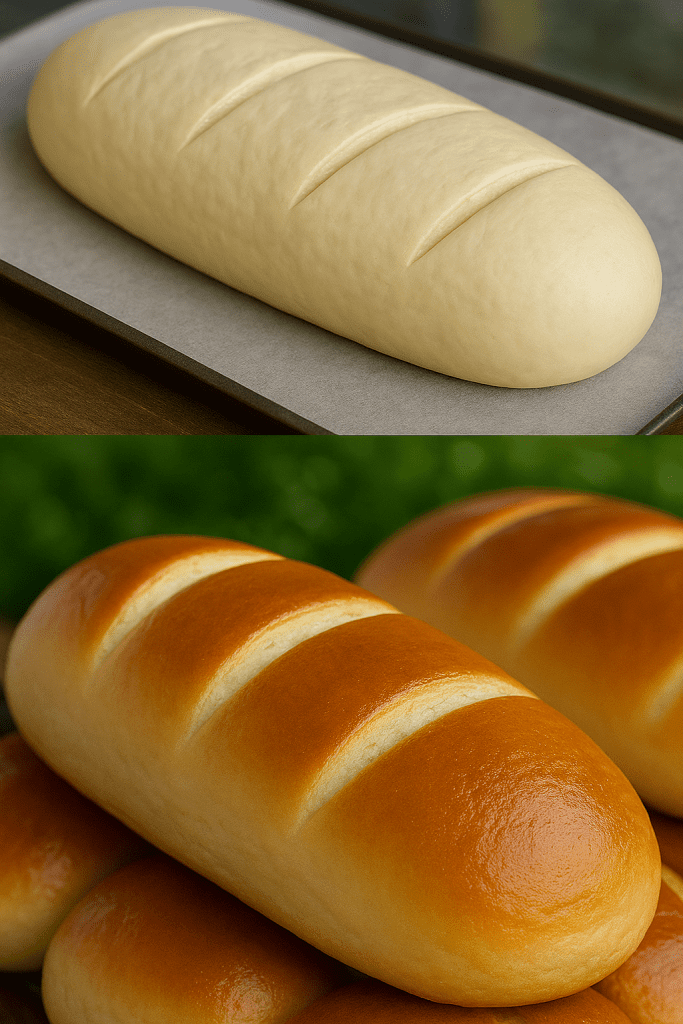
3. Shape the Loaves (5 Minutes)
Once the dough has doubled, gently punch it down to release the air. Turn it out onto a lightly floured surface and divide it into two equal portions. For each portion, gently flatten the dough into a rough rectangle, then fold and roll it into a 12-inch log. Pinch the seams to seal and place each log seam-side down on a parchment-lined baking sheet. If you’re using cornmeal, sprinkle a little on the parchment for a rustic, bakery-style finish.
Shaping the loaves is where you get to play artisan baker. Don’t worry about perfection—the rustic look is part of the charm.
4. Second Rise (30 Minutes)
Cover the shaped loaves with a towel and let them rise for another 30 minutes, or until they look puffy and slightly expanded. While the dough rises, preheat your oven to 450°F (230°C). If you have a baking stone or steel, place it in the oven now to heat up for an extra-crispy crust.
This short second rise gives the loaves their final lift, ensuring a light and airy interior. Use this time to prepare for baking—your kitchen is about to smell like a dream.
5. Score and Bake (20-25 Minutes)
Using a sharp knife or a bread lame, make three diagonal slashes across the top of each loaf. These cuts allow the bread to expand beautifully in the oven, giving it that classic French bread look. For an extra-crispy crust, lightly mist the loaves with water just before baking, or place a pan of boiling water on the oven’s bottom rack to create steam.
Bake the loaves for 20-25 minutes, or until they’re a deep golden brown and sound hollow when tapped. The crust should be crackly, and the aroma will be irresistible.
6. Cool and Enjoy (30 Minutes)
Transfer the baked loaves to a wire rack and let them cool for at least 30 minutes before slicing. This cooling time allows the crumb to set, making it easier to cut clean slices. If you can resist tearing into the warm bread immediately, the wait is worth it for the perfect texture.
When you finally slice into the loaf, you’ll hear the crust crackle and see a soft, airy interior that’s begging for butter, jam, or a dunk in your favorite soup. This is the moment you’ve been waiting for.
Pro Tips for Next-Level French Bread
Want to elevate your bread to true bakery quality? These tips will take your loaves from great to unforgettable.
🌡️ Perfect Water Temperature: Use a thermometer to ensure your water is around 105°F (40°C). Too hot, and you’ll kill the yeast; too cold, and the rise will be sluggish.
💨 Steam for a Crispy Crust: The boiling water trick mimics a professional bread oven, giving you that shatteringly crisp crust.
🌾 Flour Power: Try a mix of 2 cups bread flour and 2 cups all-purpose flour for a slightly chewier texture that’s still light.
🧂 Don’t Skimp on Salt: It not only enhances flavor but also controls the yeast, ensuring a balanced rise.
🥖 Storage Smarts: Store leftovers in a paper bag to maintain the crust’s texture for up to 2 days. For longer storage, wrap tightly and freeze for up to 1 month. Reheat in a 350°F (175°C) oven for 10 minutes to revive the crust.
These small tweaks make a big difference, turning your homemade bread into something you’d proudly serve at a dinner party.
Serving Ideas to Spark Joy
This French bread is a blank canvas for delicious creations. Here are some ways to enjoy it that will keep your taste buds dancing.
🥪 Sandwich Star: Slice lengthwise and pile high with deli meats, cheese, and fresh veggies for a classic French sandwich.
🍅 Bruschetta Bliss: Toast thick slices, rub with garlic, and top with diced tomatoes, basil, and a drizzle of olive oil.
🧄 Garlic Bread Heaven: Slather slices with butter, sprinkle with garlic and parsley, and broil until golden.
🍲 Soup’s Best Friend: Serve alongside a steaming bowl of tomato soup, creamy potato chowder, or hearty beef stew for dunking.
🧀 Cheese Board Companion: Pair with soft cheeses, olives, and fruit for an elegant appetizer spread.
Each bite of this bread enhances your meal, making every moment at the table feel special. Whether it’s a casual lunch or a festive gathering, this bread is your secret weapon.
Why This Recipe Keeps Readers Hooked
This French bread recipe isn’t just a set of instructions—it’s an experience. The simplicity of the ingredients and process makes it accessible, while the stunning results spark a sense of pride. It’s the kind of recipe that resonates with home cooks who crave authentic, soul-warming food without the fuss. The clear steps and pro tips empower beginners, while the versatile serving ideas inspire seasoned bakers to get creative.
The sensory details—the crackle of the crust, the warmth of the loaf, the aroma filling your kitchen—tap into nostalgia and comfort, keeping readers engaged. By focusing on the joy of baking and the satisfaction of sharing homemade bread, this recipe builds an emotional connection that makes readers want to linger, try the recipe, and explore more.
Make It Your Own
This French bread is endlessly customizable. Feeling adventurous? Try these variations to put your own spin on the classic.
🌿 Herb-Infused: Add 1 tbsp of dried rosemary or thyme to the dough for a fragrant twist.
🌾 Seeded Crust: Brush the loaves with water and sprinkle with sesame or poppy seeds before baking.
🧀 Cheesy Delight: Fold in ½ cup of grated parmesan or cheddar during shaping for a savory surprise.
🍞 Mini Loaves: Divide the dough into four smaller logs for individual-sized breads, perfect for dinner parties.
Each variation adds a personal touch, making this recipe one you’ll return to again and again. What will your signature version be?
The Joy of Baking at Home
There’s something deeply satisfying about baking your own bread. It’s more than just food—it’s a labor of love, a connection to tradition, and a gift to those you share it with. This French bread recipe captures that magic, turning simple ingredients into a masterpiece that fills your home with warmth. Whether you’re baking for a quiet evening or a lively gathering, this bread will steal the show.
So, preheat your oven, grab your flour, and let’s create something beautiful together. Your kitchen is about to become the heart of your home, and this French bread is the perfect place to start.


